Obey safety precautions and complete the step-by-step instructions to charge the battery pack. Connect the USB-C port to an external DC power source with the specified Topcon cables with overcurrent protection. Monitor the charge status on the LED indicators.
You can connect the HiPer XR GNSS receiver to an external DC power source with the USB-C to SAE accessory cable. For example, you can use a vehicle battery with 8 to 16 VDC to operate or charge the receiver.
Caution: Do not use a power input more than 27 VDC. It can cause damage to the receiver.
Warning: When you connect an external battery the receiver, make sure that you use the specified Topcon accessory cables. These cables have overcurrent protection for safe operation and to prevent damage to the receiver.
To charge the internal battery pack with external DC power:- Connect the SAE to USB-C cable to the USB-C connector on the HiPer XR GNSS receiver.
- Connect the SAE to USB-C cable to the SAE to SAE extension cable.
- Connect the SAE to SAE extension cable to the SAE cable with alligator clips.
- Connect the alligator clips on the SAE cable with alligator clips to a charged battery.ADDITIONAL INFORMATION:
Figure: DC power connection 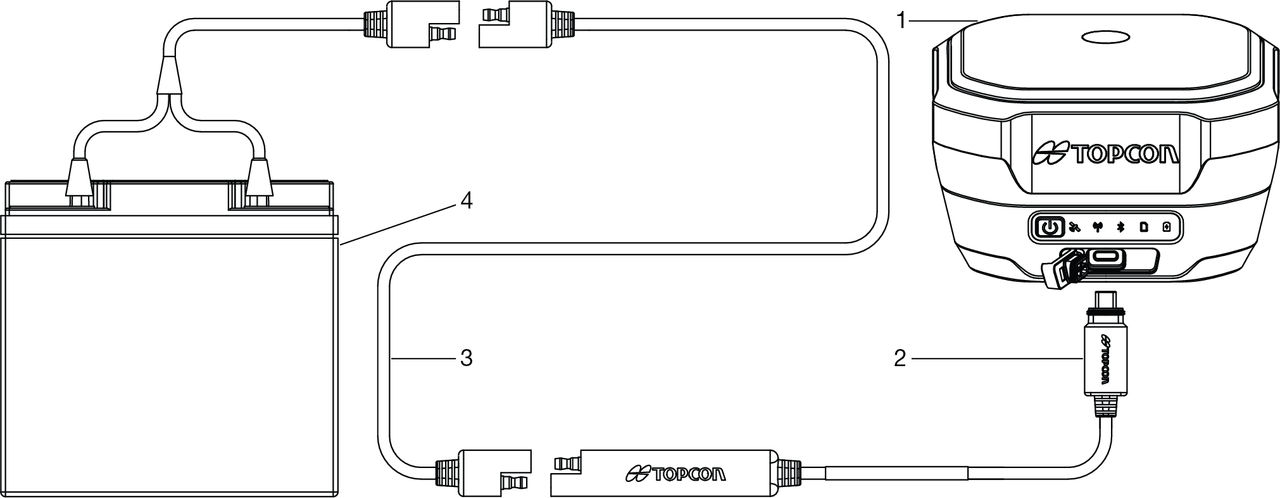
- Receiver with USB-C connector
- SAE to USB-C cable
- SAE to SAE extension
- SAE Cable with alligator clips
- Battery
The Power button/LED on the HiPer XR GNSS receiver shows when external power is applied. The Battery capacity LED flashes during the battery pack charge process. The color of the LED shows the charge level.
Previous:
Battery charging with external AC power
Next:
Insufficient power
myTopcon NOW! support
Take your Topcon experience to the next level with myTopcon NOW! This platform is a self-service tool for your desktop or mobile device.


